

BSOD errors in Windows are never a welcome sight. A particularly infamous blue screen crash is the dxgmms2.sys error, which usually occurs while gaming. Accompanied by a message such as SYSTEM_THREAD_EXCEPTION_NOT_HANDLED or DRIVER_IRQL_NOT_LESS_OR_EQUAL, the error mostly results from a malfunction in your graphics drivers or of your material.
However, it can also be due to other underlying issues. Luckily, you can fix the error right at home, using the fixes listed below.
1. Manage Graphics Drivers
The first way to go when dealing with the dxgmms2.sys blue screen is to make changes to your graphics drivers. If you can’t remember when the display drivers were last updated, update them. The error may also appear after recently installing a new driver update. In this case, you should try rolling them back to a previous update.
There are two main ways to manage your graphics drivers. If you’re using a dedicated graphics card, it’s a good idea to use add-on software such as NVIDIA GeForce Experience or AMD Radeon Software, depending on your GPU. You can also manage all your drivers using Windows Device Manager.
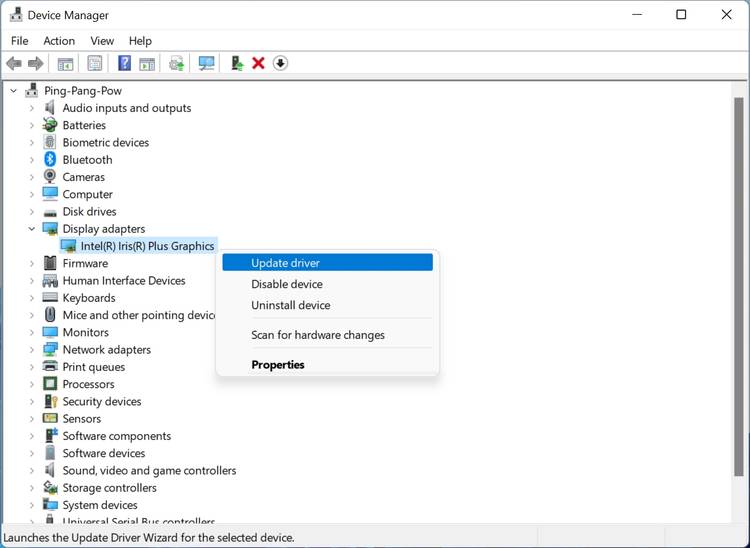
How to Update Graphics Drivers Through Device Manager
If you want to update your drivers using Windows, here’s how:
- hurry Win + R to open the Run application.
- Here, type devmgmt.msc in the text field and press Enter. This will open the Device Manager window.
- look for it Screenshot taken section and expand it.
- Right-click on the graphics driver, usually referred to by the name of your GPU or manufacturer, and click Update Driver.
- On the next screen, select the Automatically search for drivers option.
- Wait for Windows to download and install the latest driver.
- Click on To finish.
- Restart your computer.
How to revert to a previous driver version
Alternatively, if you think a recent driver update is causing you problems, here’s how to revert to old drivers:
- Open the Run command (Win + R).
- Enter devmgmt.msc in the text box and press Enter to launch Device Manager.
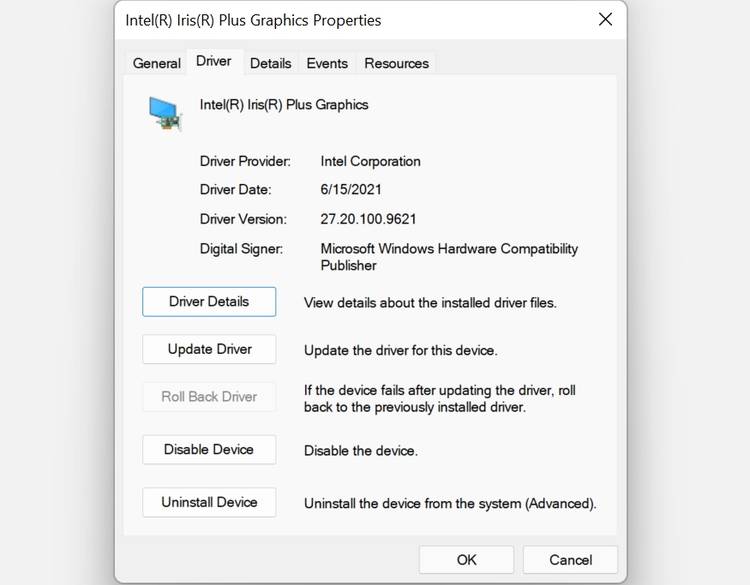
- Again, expand the Screenshot taken menu.
- Right-click on the display driver and click Properties.
- In the Properties window, click the Driver tongue.
- Click on the Driver Rollback button.
- Wait for Windows to install the previous version of the driver.
- Click on Okay.
- Restart your computer.
2. Disable Hardware Acceleration
Another common reason for the dxgmms2.sys error is the hardware acceleration feature of Windows 10 and 11. The hardware acceleration feature helps improve the performance of your computer, but you can disable it to see if the dxgmms2.sys error persists.
You will need to modify registry settings to disable hardware acceleration, so be sure to create a system restore point before proceeding.
- hurry Win + R to open the Run application.
- Type regedit in the text box and press Enter. You will need administrator privileges to make changes to the Windows registry.
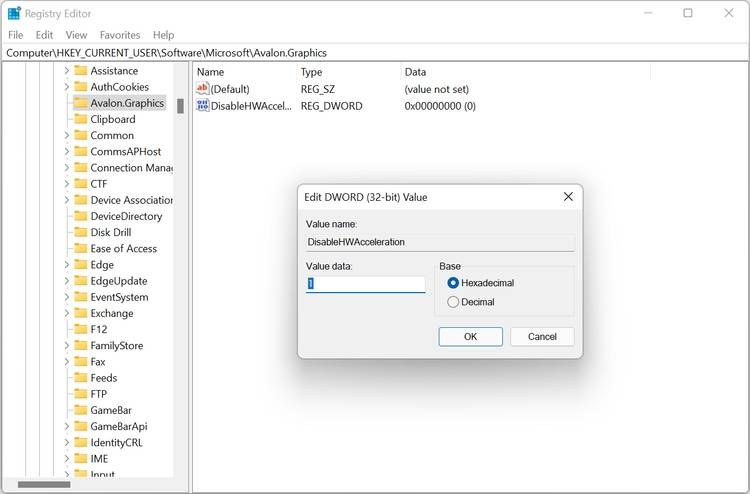
- In the registry, navigate to HKEY_CURRENT_USER > Software > Microsoft > Avalon.Graphics using the navigation pane on the left.
- Here, right-click on the empty space in the right pane and navigate to New > DWORD (32-bit) value.
- Name the entry DisableHWAcceleration.
- Now double click on the newly created entry and under Value datatype 1.
- Click on Okay.
- Quit Registry Editor and restart your computer.
If you still get the blue screen error after this method, make sure to re-enable hardware acceleration by changing the value data in the DisableHWAcceleration entrance to 0.
The dxgmms2.sys error is directly related to DirectX on Windows. In fact, the filename itself is short for DirectX Graphics MMS.
Therefore, one of the best ways to effectively diagnose the problem is to open the Windows built-in DirectX diagnostic tool:
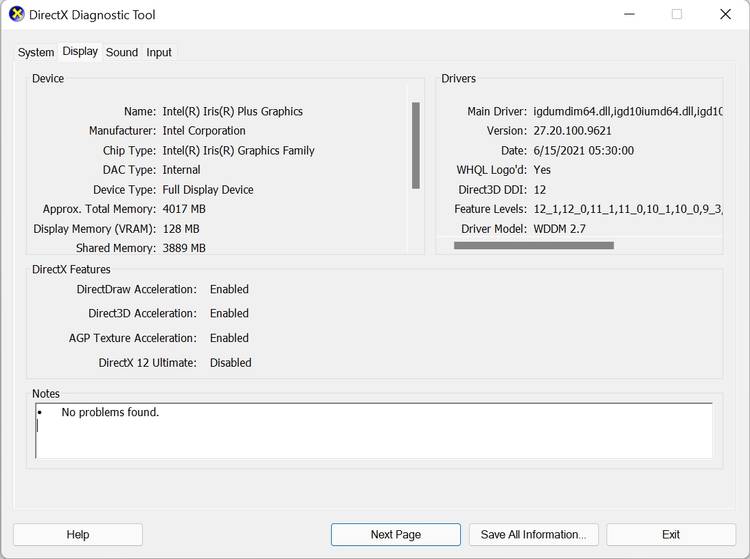
- Launch the Run command using the Windows key + R shortcut.
- Type dxdiag in the dialog box and press Enter. This will open the DirectX diagnostic utility.
- Wait for the DirectX Diagnostic Tool to finish troubleshooting.
- Now click on the To display tab in the window.
- Check the Remarks section for any errors or conflicts.
- If you see an error in the section, download the DirectX web installer to reinstall the required components.
This should resolve the dxgmms2.sys error for many users. If not, proceed to the next step.
4. Run Windows Memory Diagnostic Utility
In rare cases, bad or failing memory can also cause the dxgmms2.sys blue screen. Also in this case, Windows has a built-in utility that can effectively diagnose and fix problems. The tool is called Windows Memory Diagnostic.
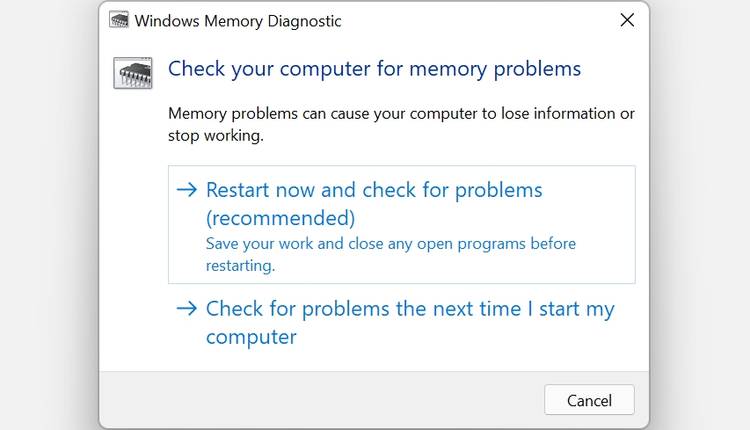
- In the Start menu search bar, search for Windows Memory Diagnostic.
- A prompt will appear.
- Click on the Reboot now and check for issues option to immediately restart your computer.
- You can also choose the Check for problems the next time I start my computer option if you have unsaved work open on your computer.
- Windows will check for memory-related issues when your computer starts.
5. Update BIOS
An outdated BIOS can lead to many errors on your PC, one of them is the dxgmms2.sys BSOD. It’s a good idea to always keep the BIOS updated to the latest version.
Although the methods for updating your PC’s BIOS may differ from manufacturer to manufacturer, the general process looks like this:
- Visit the downloads section of your motherboard manufacturer’s website and download the latest version of the corresponding BIOS. Check the motherboard model on your computer before doing this.
- If the update is in the form of a ZIP or RAR file, extract its contents to a USB flash drive. Make sure there is nothing else on the USB drive.
- Now click on To start up button, then click the Power option.
- Taking Changeclick on Restart.
- On the next screen, go to Troubleshooting > Advanced Options > UEFI Firmware Settings > Restart.
- You will now need to navigate your motherboard’s BIOS menu until you find the option to Update. Many motherboards allow you to flash the BIOS update using a USB drive, so make sure the USB drive is inserted.
While the steps above give you a general overview, it’s always best to refer to your motherboard manual for specific instructions. Some manufacturers also offer a companion app that will automatically update the BIOS.
The DXGMMS2.SYS error, now fixed
The methods listed above will resolve the dxgmms2.sys error for most users. However, a hardware failure can also cause the error, in which case you will need to replace your GPU or RAM. There are many other signs that can tell you if it’s time to upgrade the GPU.

Read more
About the Author
Comments are closed.